Featured
- Get link
- X
- Other Apps
Paul Hollywood's Classic Cottage Loaf
Hi, this recipe was sent to me by my grandparents and you can find the link here.
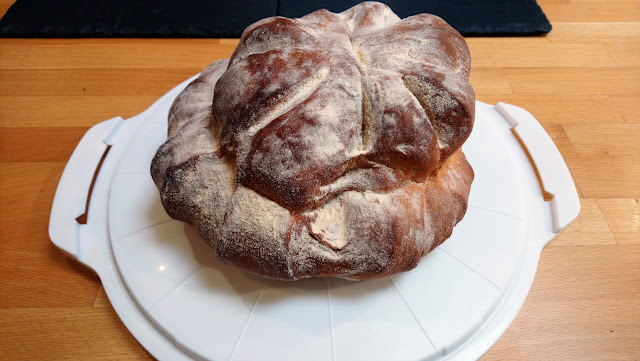
I made this loaf as a Mother's Day (27th March) present for my mum and it went down really well. It was super soft and light in the middle and baked through really nicely. I was a bit disappointed with the rise as I had positioned it at an angle so it rose slightly lopsided, however this was only an aesthetic thing and didn't interfere with the bake at all.
For me, I found the instructions relatively easy to follow. But, I have made bread before and so knew some of the techniques already but others were new to me. So, in places where I have previously gotten confused, and where I had to look it up this time, I have included links to video instructions as it can help to see what is supposed to be happening.
If you wish, you could adapt this bread for all manner of occasions like a Christmas bread (adding in mixed spices and dried fruit and peel), or a more savoury bread (adding in olives, herbs, cheese or meats), or a spiced bread (adding in turmeric or cumin or garam masala). Essentially, whatever floats your boat. However, if you leave it plain, there is more in terms of variety of topping and how to serve. For example a plain loaf works with ham or jam sandwiches. But, it's up to you and why you're baking it.
Enjoy!
Hazel :)
Dietary Info:
-No Nuts
-Contains Dairy
{I used a margarine in mine, so any dairy-free spread will work too. You could potentially try using a couple of tbsp of olive oil as well.}
-Contains Gluten
{There are many gluten-free plain flours around nowadays that you could use in place of this one
-Unsuitable for Vegetarians
{See 'Contains Dairy'.}
-Unsuitable for Vegans
{See 'Contains Dairy'.}
***
***
Serves: 1 loaf
Difficulty: Easy
Hands-On Time: 20 mins, plus rising
Baking Time: 40 mins
Ingredients:
-500g strong white bread flour, plus extra for dusting
-7g fast-action dried yeast
-7g fine salt
-50g lard, cut into small pieces and softened {Any sort of butter or spread will work here, I used Clover buttermilk margarine.}
-oil, for greasing {This should be a neutral oil e.g. olive or vegetable. If you used chilli oil, it would add a bit of a kick to the loaf but if that's what you want then it's fine.}
You will also need:
-baking sheet lined with baking paper
Method:
1: Tip the flour into a large bowl and add the yeast to one side {of the bowl} and the salt to the other. Add the lard and pour in about 225–250ml of water. {I used 250ml.} Mix using one hand, then add a further 75–100ml of water (you may not need it all, or you may need a little more) {I barely needed any more in mine.}, a little at a time, until all the flour is incorporated and the dough is soft but not soggy.
2: Tip the dough onto a lightly floured work surface and knead for 5–10 minutes, until it is smooth and silky. {It should bounce back a bit when poked and if you were to pinch the dough between your fingers and rub them together, you shouldn't be able to feel any grains; the dough will be smooth. This is known as the pinch test and shows all the flour and yeast is worked into the dough.}
3: Place the dough in a lightly oiled bowl, cover with a clean tea towel and leave to rise until doubled in size. This will take at least 1 hour and can take 2–3 hours, or longer, depending on the room temperature. {I put it into our airing cupboard and would recommend you put it into a warm place too, mine took 2hours in there. If it is very cold everywhere, you can put the dough to proof in the fridge overnight.}
4: Tip the dough onto a lightly floured surface and fold it inwards repeatedly to knock out the air and ensure that it rises upwards, rather than outwards. This is especially important in a freestanding loaf without a tin to support it.
5: Tear off one third of the dough and set aside. {These instructions may make no sense to you; don't worry I was the same. To clarify what it meant, I watched a YouTube video, which I will link here. This should help the instructions clearer. Watch from 2:19.} Shape the larger piece into a ball by first flattening the dough into a rough rectangle, then rolling it into a thick oblong. Turn the dough so that the longer edge is running away from you and flatten it slightly. Now fold in the two ends to the centre and press them down, so you end up with a chunky, squarish shape. Turn the dough over, so that the join is underneath.
6: {You may also need to watch a video on how to do the shaping. I have done this technique before, so was familiar with it. But, if you're not watch this video from 18seconds.} With your palms turned upwards, put your hands on each side, slightly under the dough. Move the cob around, tucking the dough neatly under itself as it turns. You are gently forcing the sides of the dough down and underneath, to create a smooth, taut top and a rough underside. Avoid using too much extra flour during shaping. Place the ball of dough on the prepared baking tray.
7: Repeat the rolling and shaping for the smaller piece of dough, then place the smaller ball on top of the larger ball. Flatten the top slightly, then dust your middle finger and forefinger with flour and push them through the centre of the loaf all the way to the bottom. Use a sharp knife to make 8 slashes in the surface of both the top and larger lower part of the loaf.
8: Place the tray inside a large, clean plastic bag {I covered loosely with clingfilm. Make sure there's enough space for the dough to rise in.} and leave to prove for 1 hour, or until well risen, and springy when prodded. {This went back into the airing cupboard for me, if you have no warm spaces, leave at room temperature for as long as it takes. Also, make sure the surface you put the tray on is flat, mine was a bit lumpy and so the dough rose at an angle because the weight wasn't distributed evenly across the loaf.} Meanwhile, heat the oven to 230°C/210°C fan/450°F/Gas 8 and put a roasting tray in the bottom of the oven to heat up.
9: Remove the risen loaf from the bag and dust with flour. {This isn't a heavy dust with flour, my Dad did this bit for me and put on more flour than I would recommend because the more flour you put on top, the flour is just going to burn. It should be a light dusting, not as much as is on mine.} Fill the roasting tray with cold water to create steam and put the bread in the oven. Bake for 15 minutes, then lower the oven to 190°C/170°C fan/375°F/Gas 5 and bake for a further 20–25 minutes, until crusty, golden brown and the base sounds hollow when tapped. (If not, put it back into the oven for another 5 minutes.)
10: Transfer the baked loaf to a wire rack to cool.
While you're here...
I have a Pinterest for all my recipes, where you can save them to boards for the future and categorise them into different types of recipe e.g Sunday Dinners, picnic ideas etc. My account is @hazellikestocook, or find the link below. Also, I have a whole blog post explaining this in more detail here and https://hazelscookingandbakingblog.blogspot.com/2021/02/pinterest.html.
https://pin.it/5xDvARk - my profile
This recipe:
- Get link
- X
- Other Apps


Comments
Post a Comment