Featured
- Get link
- X
- Other Apps
Peach & Cardamom Jam || PLUS How to Sterilise a Jam Jar
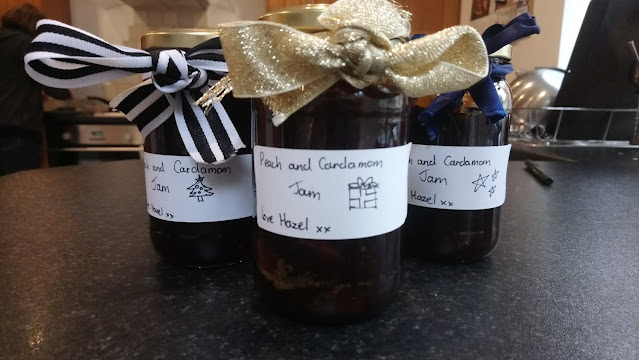
Hi, this recipe is from BBC Good food's magazine, September 2021 issue, page 110 by Cassie Best. Also, access online here and in bold below. This was my first time making jam and I really enjoyed it, I think in the future I would definitely make more jam as it was relaxing and not neccessarily easy, but a welcome challenge. This time, I am going to give these away for Christmas presents to my family, so will not know too much about how well they keep and age. However, I am going to ask for feedback on them, so when received I will add it in here. I can tell you now though that the texture looked good and thick (like proper jam!!) and when I tried a bit, it was quite sweet, but not so like strawberry jam, more like apricot. My only problem was that I burned some of the jam while I was thickening it. This meant I couldn't fill 3x400g jars all the way to the top, one has a bit less than the others. But, it's a learning process so next time it is less likely to happen. To finish, I used sticky labels and wrote the jam flavour on them, and finished off with a ribbon around the edge. I also wrote a card to go with which said it was homemade by myself and their best-before dates.
Enjoy!
Hazel :)
***
Dietary Info:
-Dairy-Free
-Nut-Free
-Vegan
-Vegetarian
-Gluten-Free
-Condiment
Prep: 10 mins {This depends on how fast you can chop peaches.}
Cook: 30 mins {Much longer, total time, including jarring up, around 2hours.}
Makes: 3 x 400g jars
Ingredients:
-1.2kg ripe peaches (about 12), halved and stoned {Weight is including stones, I used about 14.}
-1 lemon, zested and juiced {I used 2tbsp lemon juice bottled as I accidentally used the lemon I had brought in my salmon dish earlier this week (blog post on it here).}
-15 cardamom pods, cracked, seeds removed and reserved {You can discard the skins, you only need the seeds.}
-800g caster sugar
Method:
1: Sterilise three 400g jars (see tip, below) and put a saucer in the freezer to chill (you will use this later to test whether the jam has set). {I recommend 2-3 saucers in the freezer as you may need to retest your jam a couple of times if it is not quite ready.}
2: Cut each peach half into six to eight pieces, then tip the fruit into a large saucepan {Make sure this is your biggest deepest pan, as mine was the deepest saucepan I own, but next time I would be tempted to use a stewing pot as it is deeper.} set over a medium- low heat along with the lemon zest and juice. Bring the mixture to a gentle simmer and bubble for 10 mins –the peaches will turn juicy and start to soften.
3: Crush the cardamom seeds with a pestle and mortar and add these to the peach mixture along with the sugar. Reduce the heat to low and stir until the sugar has dissolved. {This can take a while, I was stirring for a long time because there's a lot of sugar and it's on a low heat.} Once dissolved, turn up the heat to medium-high and bubble for 15-20 mins, stirring occasionally to prevent the jam from catching, {When you stir be careful, as for me the jam was spitting quite a lot and it burn me so keep arms out of the way!} until the jam is set and has reached 105℃ on a sugar thermometer. If you don’t have a thermometer {I don't have one.}, spoon a little of the jam onto the chilled saucer, leave it for 30 seconds, then draw a line through it with your finger – if it wrinkles and doesn’t flood the gap, it’s ready. If not, boil for 2 mins more, then check again.
4: Leave to cool for 10-15 mins to allow a more even distribution of peach chunks. You may find that a little foam rises to the top; if so, simply stir this back into the jam. Use a funnel to help you fill the jars or do this with a ladle, {I used a ladle. Make sure to have a sponge on hand to wipe jars and any splashy bits from the pan/ladle.} being very careful as the jam will still be extremely hot. Seal with the lids, then store in a cool, dark place.
Unopened jars will keep for up to a year. Once opened, keep the jam in the fridge and eat within a month.
Recipe tip || How to STERLISE A JAM JAR
Heat the oven to 140℃/120℃ fan/ gas 1/280℉. Wash the jars in hot, soapy water, then rinse well and place on a baking sheet. {Necks facing up, like normal, NOT upside down. Also, remove lids from jars if possible.} Put in the oven and leave for about 15 mins, or until they are completely dry. (If using Kilner jars, boil the rubber seals for about 5 mins instead, as dry heat will crack them.) Fill the jars with the jam while it’s hot. {Clarification: while the JAM is hot, not the jars, they can be cooled.}
While you're here...
I have a Pinterest for all my recipes, where you can save them to boards for the future and categorise them into different types of recipe e.g Sunday Dinners, picnic ideas etc. My account is @hazellikestocook, or find the link below. Also, I have a whole blog post explaining this in more detail here and https://hazelscookingandbakingblog.blogspot.com/2021/02/pinterest.html.
https://pin.it/5xDvARk - my profile
This recipe:
- Get link
- X
- Other Apps


Comments
Post a Comment