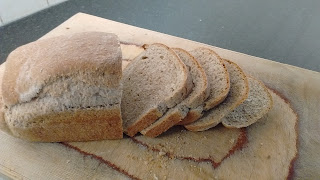
Hi, I got this recipe from
https://happyhealthymotivated.com/no-fail-whole-wheat-bread/ and it was so delicious! We tried it on sandwiches and toast; both equally amazing; and it had a slightly different flavour to shop brought bread that we all loved. I will definitely be making this again at some point. This recipe is a good easy loaf that you don't need any special equipment for , it does suggest using an electric whisk with a kneading attachment but I don't have one and I just used my hands and they worked fine. In the past, all my bread attempts have failed miserably but this worked so well and wasn't particularly difficult. I hope you have a go at making it too! Enjoy!!!
-Contains Gluten {Although, I think it's possible to find Gluten-free flour now}
-No Nuts
-Dairy-Free {If you grease the tin with dairy-free butter/marg}
-Suitable for Vegetarians/Pescatarians
-Unsuitable for Vegans {Because of the egg, however, I've heard there are some things you can do to substitute for them. But, I'm not sure if it would work in bread?}
Ingredients:
-2 cups warm water {480ml} (110F-120F / 43C-49C) {I just ran the hot tap for a bit}
-3 tablespoon brown sugar
-1 tablespoon active dry yeast {This is also 1x7g sachet of active dry yeast}
-2 teaspoons salt
-2 tablespoons olive oil + extra for greasing {I used Extra Virgin}
-1 medium egg at room temperature {Mine wasn't at room temperature as I forgot to take it out the fridge, it worked fine}
-1 tablespoon lemon juice
-3 cups whole wheat flour {450g The cup-gram conversion are off of the internet this time because I forgot to weigh it out for you}
-3 cups all-purpose flour {385g These gram conversions are off of the internet as this time as I forgot to weigh it out myself, sorry}
-butter for greasing [I used Clover Marg}
Method:
1:In
the bowl of your electric mixer, stir together the water and brown
sugar. Whisk in the yeast and cover the bowl with a cloth so the
contents are in the dark. Leave to bloom for 15 minutes. {I don't have an electric mixer so i just used an ordinary mixing bowl. Also, if using a glass bowl that is transparent, I would recommend putting it in a dark place to 'bloom' because the light will still get in the sides unlike a metal bowl.}
2:When the yeast has bloomed, stir in the salt, olive oil, egg and lemon juice until everything is blended together.
3:Stir in the whole wheat flour then cover the bowl with a cloth again and leave to soak for 30 minutes.{At this point, mine looked very similar to cake batter}
4:When
the whole wheat flour has absorbed a lot of the liquid, stir the
all-purpose flour into the bowl. Knead with the dough hook attachment
for 7 minutes, until you’ve got a strong dough. You might have to add
more warm water or all-purpose flour to get the right texture. {I kneaded the dough in the bowl for about 10mins and then I tipped it out onto the work-surface and kneaded it there for a bit and I did need to add more flour as it was quite sticky}
5:Rub
a little oil on the inside of a large bowl and drop the dough into
it. Tightly cover the bowl with plastic wrap and leave to rise somewhere
warm for 45-55 minutes, or until doubled in size. {Good places to leave dough to rise are: next to the radiator, in an airing cupboard as the heat from the boiler in there will keep it nice and warm, you could put it in a proving drawer if you have one or even outside on a really hot day. I put mine in our airing cupboard}
6:Punch the dough down and leave it to rise, covered, for another 45-55 minutes, or until doubled in size. {Make sure wherever you're rising the dough is warm}
7:Preheat
the oven to 350F/175C and generously grease 2- 4″ x 8″/10cm x 20cm loaf
pans with butter. Punch the dough down again and evenly divide into 2.
It’s a good idea to use a set of scales for accuracy. {Mine were roughly 250g of dough each}8:Form each piece of dough into a loaf-shape (
here’s a short video tutorial that shows you how) and place them inside the loaf pans.
9:Lightly
cover the loaves with a cloth and leave to rise in a warm place for 20
minutes, or until the tops of the loaves are poking 1 inch / 2.5cm above
the sides of the tin. {Mine didn't rise above the tins sides but they rose a about a cm and continued to rise fine in the oven}
10:Bake
the risen loaves in the preheated oven for around 40 minutes, until the
tops are a dark golden brown and you hear a hollow noise when you tap
the bottoms of the loaves. 11:Remove the loaves from the baking pans and leave to cool to room temperature on a wire rack before slicing.

Comments
Post a Comment